Got a permit to thru-hike the PCT this coming season? Congratulations! Planning out your resupply boxes for the PCT (or JMT) can be overwhelming. Here’s a guide to what you need to put into your boxes, a list of trail towns along the way and how to use the US Postal Service to your advantage.

Thanks to my experiences with thru-hiking, I think I’ve now fully figured out the ways of the United States Postal Service. Before I left for my five month trek up the PCT last year, I spent months pouring over guidebooks and maps trying to figure out how and where to send my boxes. It was tedious and ridiculously frustrating at times, and I can’t tell you how many evenings were spent on the verge of tears trying to figure out mileage and how much food I would need for the trip.
I eventually got it down, but there were plenty of mistakes that I made. Hopefully with this post, I can shed some light on some common issues or questions, and make planning a little bit smoother.
Sending Resupply vs. Buying As You Go
When I set out on the PCT in April of 2016, my resupply plan consisted of both sending boxes and buying what I needed along the way. Sometimes it worked brilliantly, but often it didn’t. Let’s break down the pros and cons of sending your resupply.
Pros of Sending a Resupply Box
- Cost. It costs less to send a resupply box, even when you factor in postage. Trail towns are often small mountain villages with limited choice as to where you can buy goods, with it sometimes only being a small gas station convenience store or tourist souvenir shop. The price of food is often greatly inflated. One time I had to resupply at a small shop at the Shelter Cove Resort in Oregon. It cost me well over $50 for three days worth of food, and this was after I raided the hiker box outside and scored a few things. If you send a box to yourself, you can plan way ahead and shop the weekly specials at the supermarket or even go crazy at Costco if you want. Just don’t forget to add a lot of variety.
- Special Dietary Needs. If you have any food allergies or sensitivities, are on a special diet or vegetarian/vegan, then sending your resupply ahead just makes sense. As I mentioned before, the trail towns along the way can be small and the stores will likely have a limited supply of food that you are able to eat. I’ve recently started dehydrating and assembling my own meals for long distance hiking to avoid the horrible reactions that I have to MSG, something that I discovered while I was eating processed foods while thru-hiking.
- Get in and out of town faster. Town is known as “The Vortex” for a reason; it sucks you in. This could be right up there with cost, as time spent in town usually has a huge impact on your wallet. If you spend less time shopping around for your resupply, you’ll spend less money. Get off the trail, get your box and then head back to the trail. This doesn’t mean that you can’t enjoy a treat while you’re there, it just means you’re less likely to blow past your budget (motel rooms with hot tubs are mighty tempting).
- Less Stress. Get all your stress around resupply out of the way before you hit the trail, and worry less when you’re actually hiking. Picking up a box is easy, shopping for just the right amount of food in town is a pain and time-consuming.
- Actually Enjoy Your Zero Days. Days off on the trail should be spent lounging, drinking beer, eating huge breakfast platters called “the lumberjack” and taking long hot showers. Shopping and getting your resupply in order takes up an amazing amount of time. It’s actually ridiculous. I’ve had to take an extra day off because shopping has given me anxiety and exhausted me so much, that I didn’t feel rested enough to return back to the trail. When you’re hiking the PCT, recovery time is important.
Cons of Sending Resupply Boxes
- Getting Tired of the Selection. Having the same flavors of something every week for five to six months gets old rather quickly. By week 6 on the PCT, I was officially sick of Broccoli Cheese flavor noodles or rice, Nature Valley Bars, Blueberry Clif Bars, macaroni and cheese and anything with a hint of chia seeds in it. I was over it to the point of gagging. Be sure to give yourself a crazy amount of variety. If you don’t, you’ll be tossing half of your goods into a hiker box and then spending extra money on the foods that you do want.
- Post Office Hours Are a Hassle. Picking up a resupply from a post office in a dinky trail town is often challenging. Their hours of operation are really limited, and you’re time on the trail will be dictated by this. This means if you are nearly out of food, it’s a Friday morning and you have 20 miles between yourself and town, plus a hitch to get there, you better be light on your feet and get to that post office before the 4:00 pm closing time. If you don’t make it, you’ll either be waiting around town all weekend until Monday, or buying your resupply from a Chevron quick-stop and calling your resupply box a loss. You’ll have to time everything just right.
I obviously feel that the pros of sending a resupply outweigh the cons, but it is ultimately up to you what you want to do. It’s my opinion that I will never hike another long distance trail without sending myself resupply again, as it was too expensive and too much of a pain to buy as I go.
Trail Towns of the PCT
The list of towns along the PCT is massive, so I’m not going to list it here. Instead I’ve created a downloadable PDF with the names of the towns, their mileage point on the trail if you’re heading northbound, and some additional information like post office hours of operation and other places you can send a box to be collected.
Artemis Hikes Town and Resupply Guide. (PDF)
If you’re looking for more detailed information regarding the trail towns, such as places to eat, places to stay and nearby trail angels, then there are other guides out there that you can get. There is a handy phone app called Guthook PCT (recommended) that charges a fairly reasonable price for use on the entire trail. It includes maps, campsites along the trail and user contributed content on what trail towns have to offer. There is also Yogi’s Pacific Crest Trail Handbook (not recommended) which you can purchase on Amazon. I used this book and I hated it, but judging by the reviews on Amazon, a lot of people feel differently.
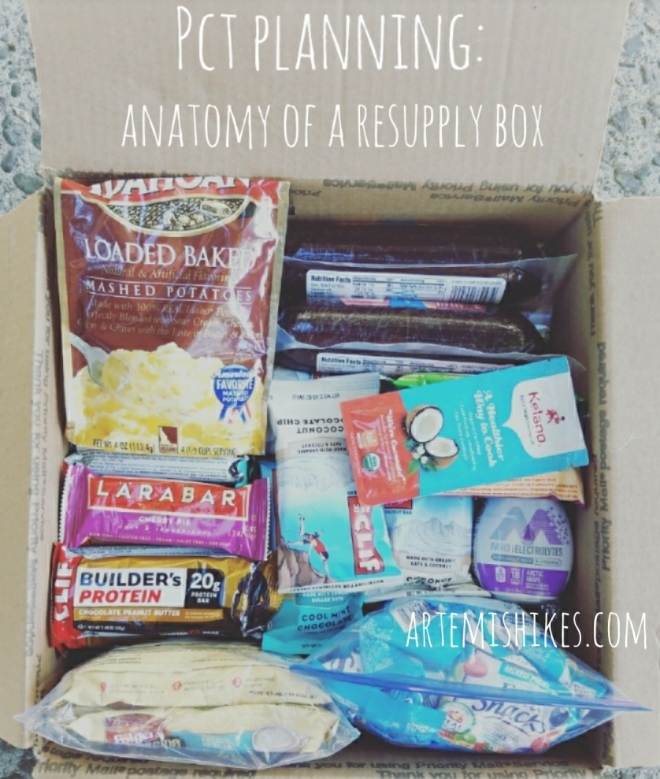
Anatomy of a Resupply Box
What goes into a resupply box? This is a question I asked myself daily for weeks on end while I was planning my thru-hike. I had a few strategies that worked out nicely, here is what I did to prep:
- Shop the weekly specials. For the weeks before I left for Campo, I stocked up on goods that were on sale at several local supermarkets. This meant that I set a weekly budget for PCT food shopping, looked at online ads and flyers, and then made a list of the things I was going to buy. For example: if Safeway was running a special on dry instant pasta meals for $1 per piece, I would stock up on about 20 or so. I kept everything I bought for the PCT separate from my everyday food, in a large Rubbermaid tub. This way the people I lived with wouldn’t get into it. I’ve said this before and I can’t stress it enough: Variety, variety, variety!
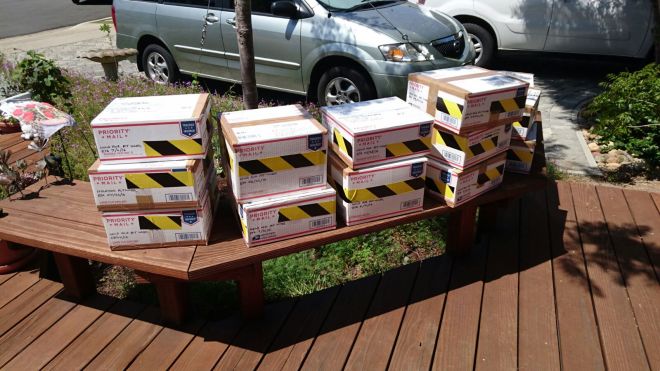
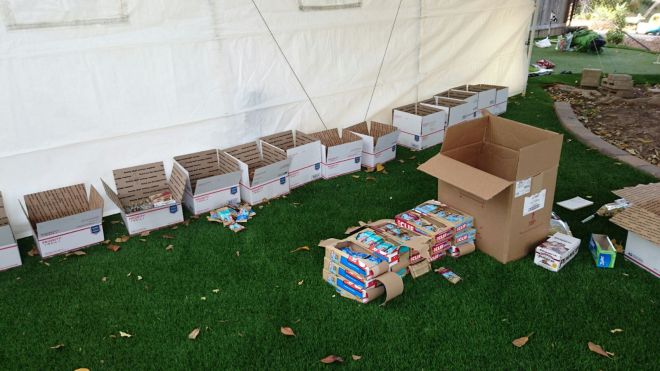
- Order Priority boxes from USPS to be delivered to you. I set up an account with USPS and ordered all of my Priority boxes online to be delivered to me. Give yourself plenty of time as they sometimes take a while to arrive. Priority boxes are free, and come in stacks of 10 to 25. If you’re wondering if you really need to send everything via Priority Mail, the answer is a hard yes. I’ll get to that in a bit (see below). Order many sizes, especially the flat rate boxes. You won’t need the envelopes.
- Stockpile travel size toiletries and condiment packets. You know those free little soaps and shampoos they give you in motels and inns? Keep those. Or buy them when they go on special at Walgreens. I can’t even begin to tell you how awesome it is to have a shower on the trail when given the opportunity. Also, those packets of ketchup, soy sauce and hot sauce you can get at fast food restaurants can really jazz up a boring instant rice dish or Spam tortilla wrap. Just sayin’.

Let’s get down to brass tacks here: what to put in that box. First of all, you’ll have to decide what kind of mileage you’re going to be doing on a daily basis and then calculate how many days you’ll be on the trail in between towns. This is the difficult part. If you already know that you can do upwards of 20 miles per day, then you won’t have much issue in knowing what to pack. However, many hikers don’t start out doing 20’s from the beginning. Be reasonable, and don’t push yourself to do a long day right out of the gate if you’ve never hiked a 20 plus mile day before. If you know you’re comfortable doing 10’s or 15’s right away, then plan for that. You’ll likely work your way up to doing 20 plus miles per day as you progress up the PCT.
As an example, I’m going to assemble a resupply box that will be picked up in the town of Sierra City, at PCT mile 1195. From there, I will need to pack about 6 days worth of food into a box that will see me to my next resupply point in Chester, 133 miles ahead. That has me doing 20 miles a day, which is a comfortable pace for me. I will likely do this section in less time, but having a little extra food is better than coming up short. I’m also planning on taking a zero day in that town, so I’m going to add a few luxury items that I can use in a motel room.
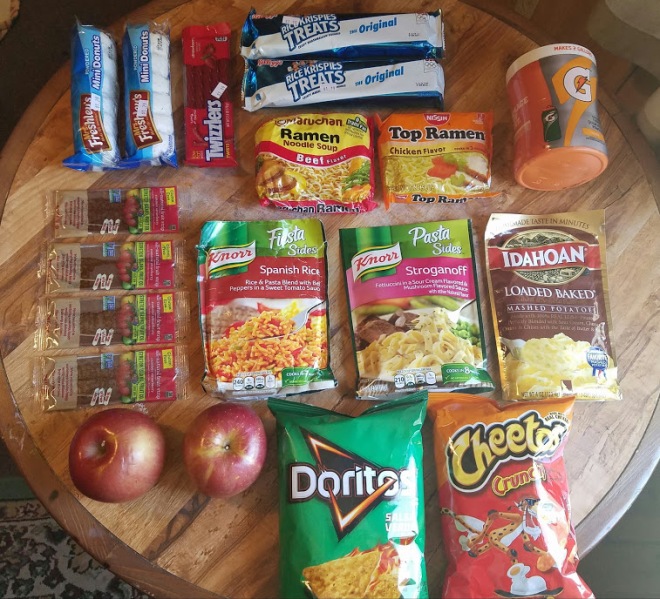
First off, the food:
- 6 Dinners: 3 instant pasta meals: 2 packets of ramen and 1 freeze-dried meal.
- 6 small flour tortillas: divided into 2 packs that I’ve vacuum sealed for freshness.
- 6 packets of peanut butter (Justin’s Classic)
- 4 Sleeves of Ritz Crackers (13.7 ounces total).
- 1-12.3 ounce package of cookies
- 6 packets of tuna
- Assorted candies: 1 bag of gummy worms, 1 bag of Juju Fish, 1 jumbo size of Twix Bars and 1 package of Starburst.
- Coffee and tea: 2 tea bags and 6 packets of instant coffee.
- 24 assorted energy bars: Clif Bars, Clif Builder’s Bars, Lara Bars and Luna Bars.
- 3 packets of coconut oil
Other things I’m adding to the box that I will pack onto the trail with me:
- 1 travel size toothpaste
- 1 travel size hand sanitizer
- A few packets of alcohol wipes
- Wet wipes
- Sunscreen
- Ibuprofen
- A few each of quart and gallon size zip top bags (trust me, they’re so handy)
Luxury items that I will use in a motel room on a zero day:
- 1 travel size conditioning shampoo
- 1 travel size moisturizer
- 1 small bar soap
- Epsom salts for soaking my feet
- A laundry pod for washing my clothes at a laundromat
Some other things I might throw in randomly, say every 10 boxes or so, is a new travel toothbrush, a couple of hair elastics or one of those little rolls of duct tape. Don’t forget to pilfer through the local hiker box, which is usually found at the post office or any location that accepts resupply boxes. I managed to almost never buy bandages on the trail because the hiker boxes provided me with what I needed without having to purchase an entire pack of them. You can also find lots of unwanted food, as well as additional toiletries, tampons or first aid supplies if needed. Also, don’t forget to pinch some toilet paper from your motel room before you get back to the trail!


As far as my food goes, I added up my calories to see what I would be consuming on a daily basis. It came out around 3200 calories per day with the food I had sent myself, and I burned 3500 calories or more per day while hiking. Even though the food in my resupply came up a bit short, I can buy something fresh in town to supplement my diet and make up for the loss. Cheese is a good filler, because it can be room temperature and not spoil (plus I love it). Salami and summer sausage are also great.
Packing and Mailing Your Resupply Box
Now that you’ve got your food sorted, it’s time to put it in a box. Based on the foods I listed above, I’m going to be putting everything into a USPS Priority Large Flat Rate Box. Everything I need to send will fit in there nice and snug, and with a weight of 11 pounds, this will be the most cost efficient way. As of publication, a Priority Flat Rate box costs $18.85 to ship. This includes tax.
Priority, Priority, Priority!
Now, you might be wondering why you need to ship Priority, as it does cost significantly more than just regular ol’ First Class snail mail. There are several very important reasons:
- You want to actually get your box. With USPS Priority, your resupply box will get to its location quickly. If you go with First Class Mail instead, it’s almost guaranteed that one of your boxes will go missing, never to be seen again.
- Tracking Number. Anything shipped with Priority comes with a tracking number printed on a receipt you get when you send it from the post office. Snap a pic of the number with your phone instead of hauling around a stack of receipts.
- Insurance. Priority Mail comes with $50 worth of insurance for your goods, in case anything gets damaged or goes missing.
- It’s Fast. Packages shipped via Priority Mail usually take 3 business days to reach their location.
- Priority Boxes are Free. I mentioned this before. They can be ordered online to be delivered to your residence or picked up at the post office (bigger post offices have a better selection of sizes).
- You can forward your box for free. USPS will forward your package to another post office free of charge with Priority if you don’t need to collect it (example: you didn’t go through your current food). The exception being the box has to be unopened.
I prefer the large flat rate boxes, as it takes the guess-work out of cost. I’m fairly certain that it is cheaper to go this route if you’re sending a larger package. If you’re not sending very much, it might be worth while to just ship it in a smaller box and pay by weight. You can look up the cost of mailing using the USPS Postage Calculator.
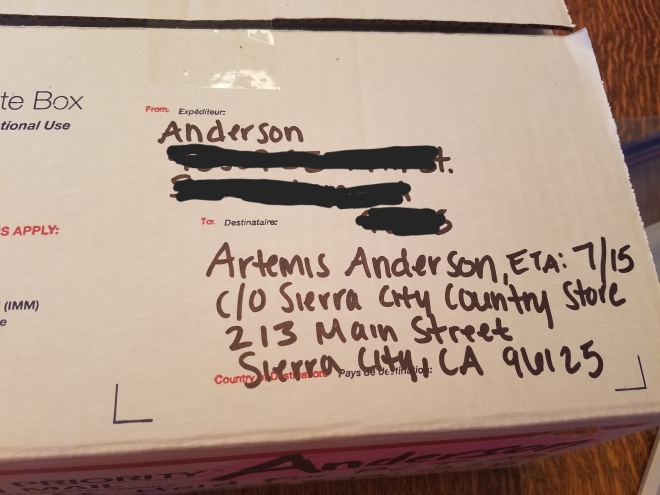
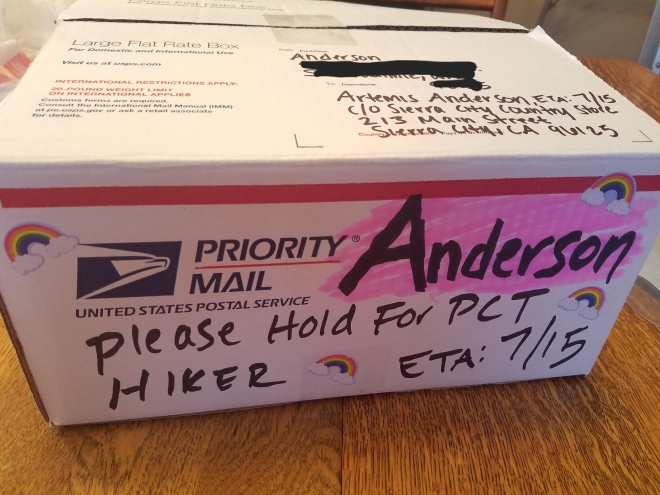
Are all your resupply goods packed into a box? Good. Then let’s move on to the next step, which is to address the box to the location of pickup. Sticking with my Sierra City resupply example, I’m going to be sending my package to the local, hiker-friendly Country Store. Here’s how to address the box:
Artemis Anderson, ETA: 7/15
c/o Sierra City Country Store
213 Main Street
Sierra City, CA 96125
There is also the option to send to the post office. If you’re going to mail a box to the local post office, then it needs to be addressed something like this:
Artemis Anderson, ETA: 7/15
c/o General Delivery
Sierra City, CA 96125
For those who don’t know, ‘ETA’ stands for ‘Estimated Time of Arrival’ and ‘c/o’ means ‘Care Of.’ (These were common questions on a PCT Facebook group from non-English speaking thru-hikers who live outside the U.S.) An ETA is valuable to postal workers because they often sort packages into sections in the back room by the date on the box. Also, remember that in the U.S. we put the month before the day when listing a date, example: 7/15 would be July 15th.
Another thing of importance is that in order to collect your package from the post office or some other locations, you’ll need government issued photo identification, such as a driver’s license or passport. Therefore, you’ll want to be sure that the name addressed on your box matches your I.D.
You also need to have a return address on your packages; one time I got lectured by a postal worker for not doing so. She claimed that by not having one, it delays shipping due to security concerns. I’m not certain how true this is, but better safe than sorry.
The post office will hold your box for around 30 days, but it’s sometimes longer than that (it depends on the space they have). If mailing to a location other than a post office, like a motel or shop, check to see if what their regulations are. They may have a limit on how long they hold a package, and they may charge a fee as well.

Bling Your Box
Next, you’ll want to make it so your box stands out from the rest, so that it’s easier for the people who go looking for your box in a storage room to find it. It’s a good idea to write your name in big, bold letters on all sides of the box using a Sharpie pen, as well at your ETA and the phrase “please hold for PCT hiker.” I used a pack of rainbow stickers that I bought at the Dollar Store to make my packages more identifiable, and some of my friends used neon duct tape or drew designs on all sides.
Now tape the ever-loving crap out of that box. To say the least, it’s going to get beat up. When I arrived in Idyllwild to pick up my resupply, it looked like it had been run over by a tank; one corner of the box was actually gone, and the rest looked shredded and smashed. Thankfully, all my food was still there and intact.
Mailing
This is the easy part! When all your boxes are packed and you’ve double checked all the addresses, it’s time to take them down to the post office. If you’re one of those lucky people who has an awesome family member or friend (a support crew) back at home that’s managing this for you as you hike, then you needn’t worry much about this part. Just be sure to communicate regularly when you need your things sent, and give them plenty of time to do so. If you’re the sole person in charge of this process, you might want to consider only mailing the California sections out ahead, and then doing Oregon and Washington when you get to Ashland.


When you are at the post office paying and sending everything, be sure to get your tracking numbers, and if you want additional insurance you’ll have to add that. The clerk you’re working with will likely ask you a few questions, including if you’re mailing any liquid, perishable or hazardous materials, to which you’ll answer no. And while we’re on the topic of hazardous materials, for the love of all that is good in the world do not put fuel in any of your resupply boxes! You can easily find it along the trail; trust me. Shipping fuel, a hazardous material, is a whole other process of crazy that I’m not going to get into. It’s unnecessary, so don’t do it. As far as the liquid or perishable stuff goes, they aren’t too concerned about your travel size shampoo or your chocolate chip Clif Bars. They’re talking about things like fresh seafood and bottles of wine here.
Tip: If you have the choice to send a resupply box to a location other than a post office, do that! Some motels, grocery stores, tourist shops or trail angels accept packages either for free or for a small fee (usually around $5). This will save you the stress of trying to get to the post office before closing time, or even worse, before the weekend. These places are typically open everyday, and sometimes later in the evening than the post office would be.
Planning Resupply from Abroad
If you’re a non-U.S. citizen, then you’re going to have it a bit harder than the rest of us when it comes to putting together your packages. For certain reasons, you won’t be able to assemble and mail your boxes from outside the country, or bring it in on a flight. Obviously the cost of shipping is a huge factor, as well as the time it takes for a package to go through the customs process. The main issue, however, is that the United States has a lot of restrictions when it comes to bringing food into the country. All meat, fruits, vegetables, rice and most dairy products (with the exception of some cheeses) are prohibited from entering the country. All other food entering the United States must be declared, or you face up to a $10,000 fine.

My good friend from the PCT, Bear Bait, came all the way from Denmark to hike the trail. He shared with me his process for prepping his resupply boxes, and all the pain that came with it. More or less, in his own words, this is what he experienced:
He spent weeks researching and making a long list of food and other goods he would have to purchase to get him from Campo, California to Ashland, Oregon on the PCT. This is a smart idea for a couple of reasons; most post offices or shops will only hold a package for a set amount of time, and if he didn’t make all the way to Ashland for whatever reason, he’d only be set back the cost of the California sections of food and shipping.
Prior to his arrival, he had arranged to be picked up from the train station in San Diego by a well-known trail angel in the area. He flew into Los Angeles and took the train to San Diego, and then went to stay at the trail angel’s home, who had promised to take him to several different stores (Ralph’s, Walmart, REI, etc.).
This trail angel kind of gave him the run around, not wanting to take him to the grocery stores of choice and also putting it off until later in the evenings. Bear Bait only had a couple of days to shop for what he needed, put together over 20 resupply boxes and then mail them off before the start date on his permit. With the trail angel delaying his prep work, he became quite frustrated and panicked. Straight from his mouth: Never again.
So what would he have done differently? Making the list of goods needed ahead of time was a must; that is something he wouldn’t change. Staying with and relying on the trail angel, however, he regrets.
“If I could do it all over again, I would stay in a hotel for a few days, rent a car and get what I needed at my own pace and at the stores of my choice. Very little hassle, very little stress.”

Obviously, the cost of doing it this way is going to be more. Staying with a trail angel is usually a $20 per night donation, and you share space with a large group of other hikers. But do you really want to try to organize a couple dozen boxes of food with 50 excited soon-to-be thru-hikers chattering and partying all around you? I personally need more privacy to focus. Perhaps spending a bit more on a room and a car isn’t so bad; you’d have your own space to spread everything out and visualize what you need to do.
Flat rate Priority boxes should be easy enough to find at the several San Diego U.S. Post Office locations, as you won’t be able to order them ahead of time. You also don’t necessarily have to send stuff in the provided Priority boxes; you can use just about any box you find (as long as it doesn’t have product labels on the sides, such as liquor or wine boxes). Free is nice, but you can always purchase flat packed boxes from places like Walmart or stores that specialize in shipping.
When you’ve done all of this, it could be helpful to have made an arrangement with a trail angel to pick you up and take you to the start in Campo with some other hikers. They are really helpful when it comes to this, as it is a rather difficult place to get to. They can also provide you with a U.S. based return address for your packages. Just be sure to donate to the cause.
Recommended Places to Buy Resupply Items in San Diego
- Vons. A supermarket chain with several locations. Good for dried goods, such as Knorr Rice and Pasta Sides, beans, instant rice, oatmeal, instant coffee and tea, dried fruit, tuna packets, salami and summer sausage. Very reasonably priced.
- Trader Joe’s. An imports chain of stores. A bit on the small side, but good prices on tea, some bulk foods like nuts and dried fruit, chocolate and energy bars.
- Walmart. I hate this place but the prices are really low, and besides finding your regular Knorr Sides and ramen noodles for super cheap, you can get good deals on non food items like toiletries, sunscreen and over the counter medications like ibuprofen.
- Grocery Outlet. They have low prices on some bulk items, like Gatorade electrolyte mix and a nice variety of junk food, such as pretzels, crisps and cookies.
- REI. This is the mecca of outdoor gear here in the U.S. If you’re in need of some additional gear, this is the place to get it. They also have an excellent return policy. They sell freeze-dried meals and some other hiking snacks, but it’s rather expensive to purchase it here. It is technically a co-op, so you can purchase a lifetime membership card for $20 (although not necessary). All of your purchases will be logged onto this card, which makes returning goods easy and receipt free. They also occasionally offer discounts with the card, as well as a 10% dividend on all the things you’ve purchased in a year’s time.
Let’s Hike!
Now that all of your resupply is (hopefully) settled, we can get to planning and actually hiking the trail! I hope I was able to clear up any confusion and answer some questions with this post. Didn’t see what you came for? Ask me in the comments!
As always, Happy Trails!
-Artemis ☽

Thank you for this helpful information! Preparing right is something that really stresses me and having this detailed information on how it can be done calms me down a lot.
LikeLike
I know that fuel does not go into the resupply box, but which canister size do you use and how many hot meals and drinks do you usually get out of it?
LikeLike
As I plan my 2019 thru, this information is GOLD, thank you!
LikeLike
Thank you! And congrats on your thru-hike! Hope the planning goes well.
LikeLiked by 1 person
Thanks for the information indeed, some details are really helpful for the non U.S. hiker like me haha!
LikeLike
Hello Artemis,
Thank you for this post.
I will start the adventure on PCT this year. And you post helped a lot.
Regards,
Torsten
LikeLike
When you ship to a private entity as opposed to the PO, is it always the case that you pay your fee when you pick up the box?
BTW, thanks so much for posting all these helpful hints. I am a “PCT in ’23” future through hiker.
LikeLike
Hi John,
Most private places do charge a small fee. However, motels will usually wave that fee if you stay with them. The plus side of this, though, is you don’t have to worry about the limited business hours of the small town post offices. This gives you more flexibility & time to relax!
Thanks for reading & happy trails!
LikeLike