
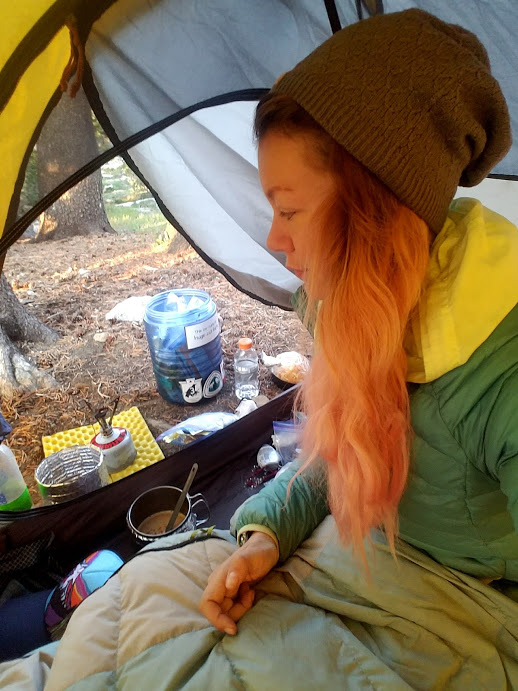
After 221 miles on the JMT, the trail taught me a thing or two. Here’s the low down on what I packed, what was good and what I won’t take next time. Bonus: Resupply locations and transportation thoughts.

First off, I want to begin with a sort of disclaimer: I hiked the JMT at around 20 miles per day, a fast pace that most thru-hikers don’t do. The impression I got on the trail was that most stick to a 21 day itinerary, with an average of a little over 10 miles a day. If that’s more your speed, that’s fine. There’s nothing wrong with going your own pace. I’m not sure where this itinerary came from, but the majority of the hikers I met were doing it this way. They had one guide-book or another, which I’m certain there are a plethora of on Amazon. If you think this is more your speed, then I suggest researching one of these guide books or reading a blog that’s based on this itinerary.
Nonetheless, if you’re a fast mover like myself, have limited days to thru-hike the trail or don’t want to carry a ton of stuff, this blog may be right up your alley.

I still had my PCT legs, and I found the high mileage fairly easy to cover during the day. That being said, it doesn’t mean that I still wasn’t completely knackered by the end of the day. After coming off the PCT last year, it feels weird not to walk all day; from early morning until evening (basically what I’m saying is that the PCT has ruined my life). As well as being fit, good gear helped me in my epically long days.
I don’t consider myself an expert by any means, as I feel every trail has something new to teach me. However, from what I saw on the trail, it seems that a lot of hikers on the JMT tend to carry a lot of gear. One could chalk this up to inexperience, but I think a lot of it is being unfamiliar with the terrain and taking extra items for “just in case” situations.
Example: “What if it snows? It is a high elevation. I’ll take some crampons, just in case.”
It’s a long distance trail, and the longest hike that most people have ever done before. A couple of hundred miles through a high elevation mountain range is pretty intimidating, especially if you’ve never been there before. People from all over the world come to hike the JMT, so how the hell is a guy from Germany or Oklahoma supposed to know what the weather averages for September are like above 10,000 feet and what to wear at that time? This is a prime situation for over packing.

Here are some things to take into consideration regarding my hike that may be helpful:
- My thru-hike was from September 6th through September 18th, with one of those days being a zero (day off) at VVR
- I was on a tight budget
- I was hiking on a PCT Wilderness permit and NOT a JMT permit, more info on that here.
- I did NOT have a backcountry camping permit for the stretch between Happy Isles and Tuolumne Meadows, so I had to day hike it.
- I also did NOT have a permit for the Whitney Portal, but you can get one from the PCTA for $20 when applying for your long distance PCT permit. I met a nice hiker with a JMT permit for two who allowed me to hike down on his permit since his partner had bailed on him. Had this not happened, I would have had to have backtracked from the Whitney Summit to the PCT and left the trail via Cottonwood Pass, an extra day’s hike. I also wouldn’t have been able to camp near Guitar Lake, as PCT permits only cover one day in the Whitney Portal area.
Here is a quick run down of my totally unplanned itinerary, just to give you an idea of the mileage I covered on a day-to-day basis:
- Day 1: Happy Isles trailhead in Yosemite Valley to Tuolumne Meadows campground, 23 miles
- Day 2: Tuolumne Meadows to a campsite on the south side of Donahue Pass (near Rush Creek) 16 miles
- Day 3: Rush Creek to just past Red’s Meadow, 22 miles
- Day 4: Camp past Red’s Meadow to Silver Pass Creek area, 24 miles
- Day 5: Zero at VVR
- Day 6: VVR to Senger Creek, 18 miles
- Day 7: Senger Creek to Evolution Lake, 19 miles
- Day 8: Evolution Lake to La Conte Canyon, 22 miles
- Day 9: La Conte Canyon to a camp along the Woods Creek, 22 miles
- Day 10: Woods Creek campsite to campsite 3 miles before Forester Pass, 21 miles
- Day 11: Campsite just north of Forester Pass to campsite above Guitar Lake, 21 miles
- Day 12: Campsite near Guitar Lake, summit Mount Whitney and then down into Lone Pine via the Whitney Portal, 13 miles

The Gear and how I felt about all of it
I previously published a gear list on my Planning and Gear post. I’m going to do my best to cover and review the same gear here, with detailed information on what worked and what didn’t. Let’s get to it.
The Big 3:
- Big Agnes Fairview 2 Tent and footprint, 3 lbs 12 oz
I like this tent, but as it is a two person model, it was a bit bulky for this trip. My single person Big Agnes tent was in the process of being repaired, so I had to settle on this. It took up a lot of room inside my pack, but held up in inclement weather and didn’t gather much condensation. I will probably stick to my original favorite one-man tent in the future just to cut back on weight and save on space.
- Exped Lightning 60 Women’s Backpack 2 lbs 8 oz
I LOVE this pack. It’s light and features an adjustable torso, as well as a clean design. I really like the roll top closure that allows you to compress the contents of the pack, as well as the minimal pockets (there’s only one on the inside). Pockets, in my opinion, are a waste of space and a black hole to lose small items in. My bear canister was able to fit inside horizontally, something that I wasn’t able to do with previous packs. This is definitely going to be my go-to pack for long hikes.
- Sleep system: Women’s Mojave +10 Down Sleeping Bag (size regular) 2 lbs 6 oz, Therm-a-Rest NeoAir XLite Sleeping Pad (size regular), 8 oz
First, the sleeping bag: I’ve had this one for some time now, probably around 6 years or so, and it’s been professionally cleaned exactly one time. I do like it quite a bit, but there’s no way in hell it would keep me warm in any temperature below 30 degrees farenheit. Another gripe of mine is that the zipper constantly catches on the delicate material, and I find myself frantically and yet gingerly fussing with it in the middle of the night while my bladder is about to explode. I may need to replace this one soon.
The sleeping pad: It’s great; super lightweight for an inflatable air mattress, blows up firm like I prefer it, provides lots of support for my back and hips and rolls up small. It is made up of thin material, so be sure all potentially sharp debris are clear of your sleep area.


Clothing that I hiked in:
- Nike Women’s DRI-FIT Cool tank top
I bought this at a Nike outlet store for around $20. It was a great shirt to hike in; soft and silky feel, thin and fast drying. I tucked it into my shorts and it helped prevent me from getting the dreaded hip belt chafe.
- Patagonia Barely Bra
I forgot to mention this bra before in my earlier pre-hike post. I love it; it’s soft and stretchy, and just supportive enough. It also doesn’t cram by bits into one weird uni-boob, which a lot of sports bras do, leading to unfortunate cleavage chafe. My only complaint is the removable padding which can shift around a bit, but the good far outweighs the bad.
- Nike Running Shorts with mesh liner
Another score from an outlet store. These are my go to hiking shorts because of the elastic and drawstring waste, and soft quick dry material. The mesh liner is my favorite feature, because then I don’t have to wear underwear that’s going to bunch up into my arse.
- Columbia PFG Bahama Long Sleeve Shirt
The best hiking shirt I’ve ever owned, and it’s technically a fishing shirt (PFG stands for professional fishing gear). It’s quick dry, protects you from the sun and very comfortable to move around in. It has a vented back to keep you cool, button closure tabs for keeping rolled sleeves up and an antimicrobial treatment to keep your hiker stink at bay. I really appreciated the large front breast pockets, which my phone fit perfectly into. This was handy for quick photo opportunities and when I needed to check my mileage app.
- prAna Women’s Halle hiking pants
I like these, but I found myself wearing them very little. When it was cold in the morning and in the evenings, I found that I was wandering around camp in my sleep tights. I brought these mostly for wearing in mosquito dense areas, but as it was late in the hiking season, the bugs weren’t much of a problem. I’ll probably leave these at home next time.
- Fingerless cycling gloves from Decathlon
Very good. I bought these at Decathlon in Britain for around £5. There’s no Decathlon stores in the U.S., but I’m sure you can find something similar at any sporting goods store or online. I bought these to protect my hands from sunburn and the callused palms that I develop from my trekking poles. They did their job well and I’ll keep using them.
- Sunday Afternoons trucker hat
It’s a trucker hat, so not a lot to say about it other than it did its job by keeping the sun out of my face and the mesh bit kept my head from getting too sweaty. The cool design earned me a lot of compliments from other hikers as well as some wilderness rangers.
- A pair of cheap plastic sunglasses
These were super cheap at my local Rite Aid and polarized. Good, sturdy plastic frames. If I lose, break or scratch them, it’s no big deal.
- Darn Tough medium weight crew socks
The best socks hands down, in my opinion. They’re crazy durable, and comfortable on my hardworking feet. Blisters are rarely a problem with these amazing socks. Also, I love the lifetime guarantee: if they get a hole, send them in for a new pair.
- Altra Lone Peak 3.5 trail running shoes
Okay, I have to admit that I loved these shoes. I’ve always been hesitant to try them out as they have a bit of an evangelical following in the thru-hiker community. I also think they’re a little goofy looking; big, awkward and colorful like clown shoes. However, they are pretty damn comfortable to walk in. The wide toe box kept me from getting blisters and they offered a good amount of support for my feet (I have high arches). After more than 220 miles, the tread and uppers are still in really good shape. I would most likely purchase another pair once the current pair has worn out. I also appreciated the velcro on the back of the shoe and the metal loop on the front for my Dirty Girl Gaiters to attach to. This shoe is obviously designed with thru-hikers in mind.
- Dirty Girl gaiters
These are probably one of my favorite pieces of gear. I bought a pair for the PCT and wore them the entire way, and I wore the same pair on this trip. They do have a couple small holes on the sides, but they are still remarkably effective at keeping stones and dirt out of my shoes. I won’t hike without them, they’re that great. Love the funky designs too.

Sleep and Camp Clothing and Accessories:
- Sleep clothes: Smartwool medium weight socks, running tights from Decathlon, North Ridge wool top and Columbia beanie.
I was pretty happy with everything that I slept in. It was always a good feeling to change into these clothes in the evening because they felt cozy. The North Ridge wool top was a bit on the thin side and could have been warmer. On super chilly nights I ended up wearing my wind jacket to bed to help me stay warm.
- Sea to Summit Thermolite Reactor sleeping bag liner, 8 oz
I’m really glad that I had this liner. It got really cold at night, especially when I was camping above 10,000 feet. This added extra warmth.
- prAna Down Puffy, 10 oz
This jacket keeps me toasty in camp in the evenings and when I’m breaking camp in the morning. It stuffs down small into its own pocket. One of my best pieces of gear.
- Lifeventure Waterproof 15 liter stuff sack
This stuff sack is thin and durable, as well as very waterproof. My sleeping bag, liner and sleep clothing all fit nicely inside. Love the roll top.
Other Clothing:
- REI Rhyolite Rain Jacket
I actually never wore this on the JMT. The only time it rained was at night, when I was in bed. From past experience, it seems to perform alright except it seems to leak water around the front zipper after prolonged use.
- Decathlon Neoprene Gloves
Again, never wore them.
- ULA Rain Skirt
Didn’t wear it on the JMT, but wore it plenty in while in Scotland. It keeps you surprisingly warm and dry, but if it’s windy it does blow around quite a bit. It’s still better than wearing rain pants in my opinion, which I believe make you more wet from sweating than from the rain.
- Columbia wind jacket
This was a great little jacket. It compressed down small inside its own pocket and was warm enough on cool mornings. I wore it around camp quite a bit and even slept in it as an extra layer for warmth.

Cook System and Water Purification:
- Sawyer Squeeze Water Filter and Coupling attachment
Another favorite of mine. I like this filter over the Sawyer Mini because it’s faster at moving water (the Mini is painfully slow for the sake of saving a couple of ounces). This filter comes with bags, but I hate them and never use them; definitely sticking with using Smartwater bottles instead. The coupling attachment is for cleaning the filter, and weighs next to nothing. It’s much better to go this route instead of using the syringe to clean it, and weighs significantly less. I used the same filter on the PCT and the only issue I’ve ever had is the rubber O-ring failing after a while. This is an easy issue to resolve, however. You can easily replace it with a similar find from any hardware store.
- BearVault BV500 food canister, 2 lbs 9 oz
Heavy and kind of a pain, but required in Yosemite and Sequoia-Kings Canyon. Not too hard to open, and I like that it’s clear and I can see my food, keeping me from digging to find what I want.
- MSR Pocket Rocket Stove
Simple, lightweight and easy to use stove. I’ve been using this same stove for almost 10 years now and don’t plan on changing it up.
- Snow Peak Titanium cook pot and lid
I’ve been using this as long as I’ve been using my stove. Not a single dent in it. It’s sturdy and my fuel canister and stove fit inside it. Ideal for a solo hiker.
- Sea to Summit Alpha Light Spork
I like the long handle that keeps me from getting my hands messy while I eat. It’s lightweight, just don’t lose it.
Not to toot my horn or anything, but this thing is pretty awesome.


Electronics, Gadgets and Apps
- Princeton Tech Remix Headlamp
A good, basic headlamp. I didn’t use it too often, mostly for midnight wee runs. I usually go to bed when it’s still light outside.
- Luci Aura inflatable solar lantern
I really enjoy this little lantern. It’s fun and convenient. I attach it to the top of my pack so the battery charges via a small solar panel. The light lasts about 4 hours once it’s fully charged, and has a color changing option. I used it mostly early in the morning before the sun was up and I was starting to get ready for the day. The soft glow from this lantern is far less offensive than the bright LED of a headlamp.
- Samsung Galaxy s7 smart phone
I got this phone last year right before I started the PCT. It takes fantastic photos, so there’s no need for me to carry an additional, heavy camera. I put it on a medium battery saving mode, and this allows me to use my camera, mileage apps and occasionally listen to music for around 5 days. I also carry a battery pack and USB cable, as well as the rapid wall charger it came with and ear buds. I’m really happy with it.
- Halfmile’s PCT app and free digital maps
I’m actually really surprised more JMT hikers don’t use this mileage app and maps since they’re both free and work on both the JMT and PCT. Downloading the maps to your smart phone is a great way to cut down on weight. Sometimes the Halfmile app is a bit slow, but it does take some work for your phone GPS to locate you when you’re in the middle of nowhere. I like knowing how far I’ve come or need to go, and I really like that it lets you know where the next available water and camping are. It also let’s you know what elevation you’re at, which trail towns are ahead and gives you alternate routes off the main trail. Here are the links: Halfmile app for Apple and for Android. Here’s the free maps (you’ll want to download California sections G and H for the JMT).
Other stuff I took with me:
- Equinox Ultralight Pack Pouch
The zipper failed on day 2, so it went into a hiker box at Red’s Meadow
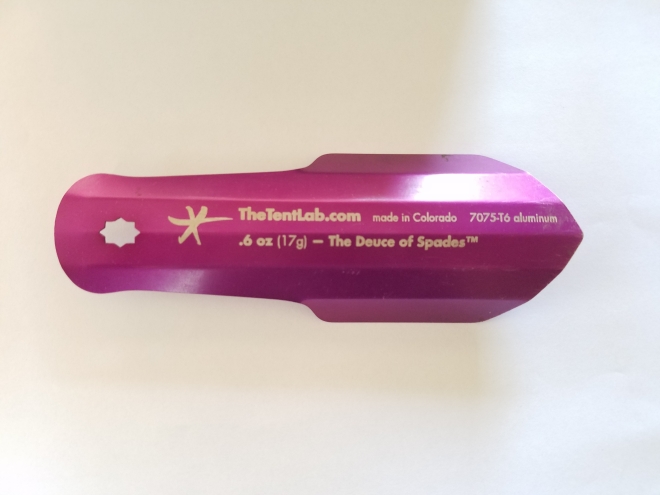
- Tentlab ‘Deuce of Spades’ trowel
A superior poop hole digging device, and it weighs less than an ounce. I never go hiking without it (and some toilet paper).
- small, trimmed-to-fit-my-butt piece of Z-lite foam pad for sitting on
This was mostly for sitting on while I had breaks, but I also used it as a barrier in my pack between my bear canister and my back. It worked out nicely.
- Trash compactor liner bag from Safeway
I used this as a waterproof pack liner, a trick I picked up on the PCT and the only way to protect your pack contents from getting wet. Rain covers for packs just don’t cut it.
- Swiss Army knife
Always a classic. I use the larger blade, scissors and bottle opener the most.
- Black Diamond Alpine Carbon Cork Trekking Poles
I’ve used the same pair on the whole of the PCT, trekking around Spain, Scotland and England. They have now survived the JMT as well. They’re still in great shape and I will continue to use them on future trips.
Items in my toiletry bag
I was happy with everything that I brought in this kit and wouldn’t change much. The only change I would make is the addition of non-stick gauze pads since I skinned my knee pretty badly in the beginning of my trip, as well as reopening the wound repeatedly. I kept all the contents in a zip top bag and not an actual toiletry bag to keep weight down. Here’s what was in it:
- Waterproof medical tape and a few bandages
- Germolene antiseptic cream, repackaged into a small travel pot container
- Burt’s Bees Lip Balm
- Neutrogena Ultra Sheer SPF 30 Sunscreen, repackaged into a (sanitized) applesauce pouch (no joke, it’s great and saves on weight)
- Wet wipes, toilet paper and a few tampons and pads
- Hand sanitizer
- Hair elastics
- Nail clippers
- Small folding toothbrush and travel size toothpaste

Thoughts on Resupply: Tuolumne Meadows, Vermilion Valley Resort and the food I packed
My strategy for my resupply went something like this: Send four days worth of food to the post office at Tuolumne Meadows, enough to get me to VVR and then seven days of food to be picked up at VVR to get me to the end.
I sent a box to Tuolumne Meadows for two main reasons; I didn’t want to travel from Seattle down to Yosemite with the food and since I was doing the 23 miles from Happy Isles to Tuolumne is a single day, I wanted to have a lighter pack to help me hike with some ease. The latter reason was obviously the most important. So the question is, would I do it again this way? Absolutely.

The haul from Happy Isles up to Tuolumne Meadows is a long one, and I did it with surprising ease. I credit this to having a light pack. The only food that I took with me that day was a few snacks, a lunch and a light dinner for that night. I’m glad that I took the dinner, as I arrived after closing time for the post office and wasn’t able to pick up my resupply until the next morning. I supplemented my dinner with a couple of snacks (and a beer) from the store, which thankfully was still open.
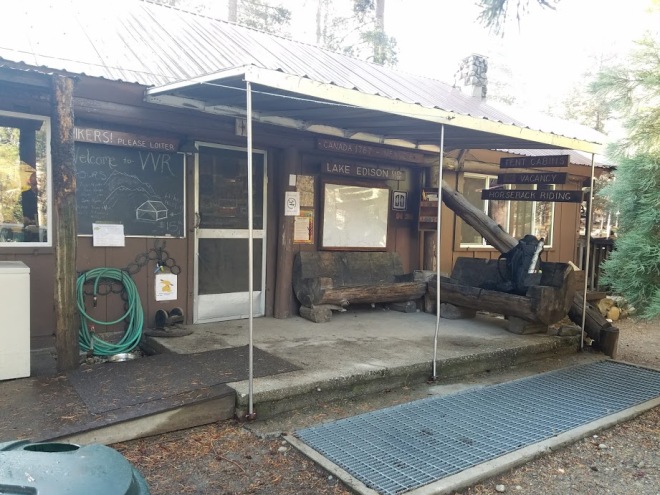
As for my resupply at VVR, I would likely do it again that way, although with some hesitation (I’ll get to that in a bit). I still wouldn’t resupply at the Muir Trail Ranch because of the ridiculous fee that they charge to hold a box (or in their case, they insist on you sending everything in a 5 gallon bucket).
This seems to be the favorite resupply spot for most JMT hikers, probably because it marks the halfway point on the three-week itinerary and there are some hot springs in the area. The hot springs on the property are for guests, which I hear it is costly to rent the various facilities at the ranch. There are some free hot springs that a lot of the hikers go for, but word on the trail is a couple of the pools are mucky and it gets pretty crowded. I happen to live within a stone’s throw of some very nice, quite clean hot springs so I didn’t even really consider stopping off here.
I find the fee for resupply at MTR to be laughable, and their sort of sob story on their website about how difficult it is to get the packages there in the first place to be equally irritating. You can read about it here. I get that the resort is remote, but they can get stuffed with that $80 fee. That’s more than the tab I ran up at VVR.
I still wouldn’t send a box to Red’s Meadow, simply because that was too soon and they charge $40 to hold a box or bucket. I reached Red’s on day 3 of my hike, and was carrying enough food from Tuolumne to get me to VVR (4 days). I would, however, carry one less day worth of food as the store at Red’s still had a great selection of food for hikers in September. More info on their resupply here.
Now, getting back to VVR. I liked my experience there for the most part: they allow you to camp for free on the property and have bear lockers for your food, and your first beer is on the house. The resupply box holding fee is significantly less than Red’s and MTR; they charged me $27. However, you do have to take the ferry across Lake Edison from the trail to the resort, and they charge around $24 for this service. You do have the option of walking in, but by the time you reach the side trail for this, the ice-cold beer and burgers are calling you pretty hard and suddenly walking seems like a nuisance and a boat ride sounds mighty fine.
You can start a tab here, to keep from running your credit card numerous times and avoiding a $2 fee to do so. This can be pretty dangerous, but the staff is more than happy to let you know where you stand on your bill. I spent around $70 here on my resupply, the ferry, a burger, beer and a shower.
I really liked the area, and had a good time gathered around the fire pit, drinking beer and talking to other thu-hikers as well as come seasonal workers at the resort. The staff was really friendly and down to earth, and they even hooked me up with an additional free beer when I helped to unload the beer truck when it arrived.
My one complaint about the place is this: they shamefully take food and other items from the hiker box and try to resell it in the shop. I watched as they went through the bin right before the afternoon ferry arrived, and plucked out everything from unlabeled Pop Tarts to single tampons and packets of Kroger brand tuna. These things were then labeled with a price and put on the shelf (there was a basket of “mystery flavor” Pop Tarts for $2 each). I get that they’re trying to run a business out in the sticks, but if the average hiker is spending the amount that I did when I was there, I would imagine they’re doing alright for themselves.
I did blow past my budget at VVR, which is no one’s fault but my own. It is an expensive place and out-of-the-way, but necessary for resupplying along the trail. From there I carried a week’s worth of food to see me to the end. I couldn’t be bothered to make another exit off the trail over Kearsarge Pass and attempt to hitch out of the Onion Valley, something that can be pretty challenging. This is something that I noticed a lot of other hikers doing though. This would add to the already mounting costs of the trail (motel, transportation, etc), and I didn’t want to take an extra day or hike the additional 14 non-JMT miles.

Most of my food was stuff that I was familiar with from the PCT: Knorr pasta and rice dishes, summer sausage, packets of tuna, cliff bars and lots of junk food. I’m pretty tired of most of it, especially the Knorr Sides. They’re too salty and don’t taste nice anymore. I think it’s high time I invest in a dehydrator and start making my own meals that I will enjoy. Cliff bars are still okay though, they can stay.
I’m still not a fan of Mountain House and Backpacker’s Pantry. I find them expensive, bulky and just as unenjoyable as Knorr. They also take twice as long to cook at JMT elevations, which is around 30 minutes in some cases.
The Transportation
Now that I’ve covered the good and the bad, let’s get to the ugly: Greyhound buses. Holy hell, what a disaster. Had I known what a terrible decision this was, I would have spent the extra dollars and flown or taken the Amtrak. My bus fare from Seattle to Merced was only $80, but it was so not worth it. Just to be clear, I’ve taken the Greyhound on short journeys before from one city to the next within Washington state, and that’s not so bad. But this journey was 24 grueling hours, which was spent stopping at every town along I-5, dealing with fellow passengers screaming into their phones, playing terribly annoying music or phone apps without headphones, and verbally abusive drivers who clearly hate their jobs, and quite possibly their lives.
Never again.

I made the same mistake twice, taking another Greyhound home from Reno to Seattle. I didn’t have a lot of time to try to find any other option, and there weren’t very many flights from Reno to Seattle that were worth booking. The bus fare home was even cheaper than before, but I suffered for it dearly.
At one point, at a layover in a station in Sacramento, they announced that the Northbound bus was lost and they had no idea where it was. How does that even happen? No apologies were given when the bus finally turned up over an hour late. In fact, once the bus had arrived and the driver was taking tickets, she barked at everyone to hurry up because she didn’t have all day. Seriously?
At yet another layover, a passenger smoked pot inside the station. Security came and yelled at them to come forward or they were going to start searching everyone’s bags. No one came forward, and security began their search. When it was obvious they weren’t going to hold buses, people began to get anxious and angry at the thought of missing their rides. The tension was scary, and it wasn’t until they had searched a few people that the guilty party decided to come forward and we were allowed to go on our way.
By the time I had reached Eugene, Oregon, and a toddler had spilled juice all over my carry on, I was researching Amtrak tickets on my phone. I wanted no more of this hassle, but it wasn’t to be. Not only does Amtrak’s website stink, but there wasn’t a train running until the next day. Damn.
However, on a more positive note, the YARTS bus from Merced into Yosemite was a nice ride, as well as the ESTA shuttle from Lone Pine to Reno. More info on YARTS here, and ESTA info here. The YARTS bus picks up from the Greyhound and the Amtrak stations and will take you right into Yosemite; very convenient.
You can make reservations on both of these buses, which I hear is pretty necessary during the summer months. I rode both without doing so, and there was plenty of room (again, in September).

Places to Stay
As I mentioned before, I was on a tight budget for this trip. Upon arrival in Yosemite, I planned on staying the night in the backpacker site behind the North Pines Campground in the Valley and then head out the next day on my big day up to Tuolumne Meadows. Some of my PCT friends did this the previous year when they hitched down from the trail to have a look around the area.
However, when I arrived at the campsite, a rather grumpy ranger with sister-wife hair made it clear that my PCT permit was NOT valid at the backpacker site. She said I needed a wilderness permit, which I reminded her that a PCT permit was, in fact, a wilderness permit. She insisted I go back to the Wilderness Center in Yosemite Village and get one. I did as she said, and a park employee (not a ranger) at the Wilderness Center had no idea what I was talking about. Just as I was about to despair, another wilderness ranger swooped in and came to my rescue. He wrote me a note and signed it, saying I was actually allowed to camp in the backpacker site. I went back to the campsite and handed the Kim Davis look-alike my permission to camp pass from her superior. She huffed and puffed a bit, and I felt vindicated.
My point is that it seems no one in the NPS seems to truly know what the hell the rules are or what is going on. This hasn’t been my first struggle with park rangers and employees, unfortunately. This doesn’t mean I don’t respect the hell out of them, though. There’s clearly a lack of communication somewhere in the chain of commands.
My experience at the Tuolumne Meadows backpacker site was far different, where I received a compliment on my hat and a high-five from a ranger for being a solo female hiker.
Both sites cost $6 per person to stay in and have a limit of one night.

Another place I stayed, as you already know, was VVR. I opted for the free camping, which was really quite lovely. The campsites were among the trees and fully shaded, and they had a couple of bear lockers to put your food in. It seemed that a lot of hikers opted for a cot in the hiker hostel tent or getting a motel room. I was fine with camping, but if you require a bit more luxury, then these are your options. Be sure to bring ear plugs if you want to stay in the hostel.
At the end of my journey, I stayed in a motel room in Lone Pine called the Portal Motel. It was inexpensive, clean, came with AC and a mini fridge, and had a bathtub to soak my tired and sore body in. There is also a hostel in Lone Pine, as well as a few other motels. I didn’t have a reservation, and getting into my room early wasn’t an issue. I don’t know if this would be the case during weekends or the high season though, so you may want to check ahead of time. If you’re following a strict itinerary, then a reservation may be possible.
Happy trails, folks.
To conclude this entry, I want to say thanks for stopping by and having a read. I’m open to questions, especially if there is something that I haven’t covered here. Just remember that different gear works for different people. I sincerely hope that I have helped in some way, or offered a bit of encouragement to get you out there and enjoying our exceptionally wild places.
I’ll see you out there!
Cheers,
-Artemis Anderson


The Luci lantern is pretty neat. The Outdoor 2.0 is said to be capable of partially charging a mobile phone, but of course it’s more expensive than the basic model. Any thoughts on that one?
LikeLike
Hmm. According to their specs, it’s capable of charging a phone “up to 30 to 50%.” If that’s true, I’m certainly impressed. I’ve seen PCT hikers with the foldable solar panels only get less than a 50% charge after allowing it to soak up sun all day. I have my doubts, but if it’s true, I’d say it’s worth the $35 price tag.
LikeLike